


I’ve been waiting on some cold weather here in Dallas so that I could have a timely reason to publish this recipe, which uses neither a smoker nor a grill. Now that we’ve just sprung forward, though, it seems like winter is simply going to forget about us this year (with apologies to the Panhandle). But maybe that’s even more appropriate for those of you who say it’ll be a cold day in Helotes before you use a vat of warm water to cook a pork steak sheathed in plastic. Don’t worry. I won’t call it barbecue, because it’s not, but if the idea of sous vide threatens you, then you can stop reading now. But for those who want to turn an inexpensive piece of pork into a tender, juicy steak with silky ribbons of fat running through it, all inside your home kitchen, here’s the recipe for you.
If the barbecue style in St. Louis was defined by what they cook in their backyards, then pork steaks, not spare ribs, would be the dominant protein. These slices of pork taken from the Boston butt, usually bone and all, are grilled and then simmered in a bubbling cauldron of barbecue sauce sitting on the cool side of the grill. The flavor of the sauce is able to penetrate the steaks as they tenderize. Snow’s BBQ in Lexington is also famous for their version, which uses only a mop sauce and relies on a bed of coals far below the meat to slowly cook it. For this recipe, I was looking to replicate the thickness and tenderness of a Snow’s pork steak, but with the barbecue sauce flavor of the St. Louis version.
Sous vide cooking is done in a vat of hot water kept at a constant temperature by a sous vide wand (I use a Joule). The meat is sealed in a plastic bag and submerged into the water for cooking times that can be days long. The meat cooks at a much lower temperature than in an oven or even a smoker, but the extended cooking time tenderizes it. There’s nothing much the cook needs to do to attend to the meat until it’s done and ready for browning.
The trick with sous vide is finding the right time and temperature. I’ve dabbled in sous vide for several years and tried a few failed pork steak experiments. They came out either too tough or falling-apart tender. I wanted a pork steak with incredibly soft fat running through the meat that could still be sliced. The problem with the trial-and-error method with sous vide is you have to wait a day or two for the results. I knew that cooking times below 24 hours or above 48 hours weren’t ideal for pork steak. I sought some advice via social media. Rob (@QuestforBurgers) suggested a cooking temperature of 149 degrees for 36 hours. Ronnie Killen, of Killen’s Barbecue, suggested a shorter cooking time, but noted the importance of a resting period after the bag of meat is taken out of the hot water.
Before we get into the specifics of the cooking instructions, let’s talk a bit about pork steaks. As mentioned before, they’re simply slices of pork from the Boston butt (pork shoulder). They are usually thin if bought in a shrink-wrapped value pack, but any butcher can slice them thick. A single bone-in pork shoulder (about five to six pounds) should be able to produce four thick steaks; you just need a butcher with a band saw to do the cutting.
For the first batch in my recent experimentation, I tried both 28- and 36-hour cooking times at 149 degrees Fahrenheit. Both turned out so tender that it seemed the extra 8 hours was unnecessary. I did learn a lot about the importance of resting, though. I rested one pork steak for an hour using a method suggested by Ronnie Killen that involved an ice bath. Too much of the gelatin in the bag cooled and remained on the surface of the meat, so browning took longer than the other that I didn’t rest, so I left out the ice in the next two iterations. I thought resting might not be important for meat cooked at such a low temperature, but the texture difference was noticeable, and I rested every version after that.
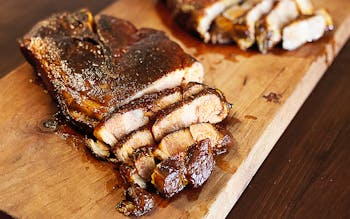
For good browning, all the moisture on the surface has to be dry before the Maillard reaction can begin. I tried resting pork steaks in the bag and outside the bag to see if one had superior browning, but dabbing the pork steak that rested in its own juices in the bag was just as good as taking it out first. Browning in two steps was also key. For all these variations, I salted the pork steaks generously, then applied a thin layer of barbecue sauce on the surface of the meat before putting them in the bags. This let the meat marinate in the sauce while cooking. It’s tempting to add more sauce before browning the meat, but you’ll get a better Maillard reaction if you brown the meat thoroughly on both sides, then brush it with sauce and brown it once again.
This recipe doesn’t require a lot of barbecue sauce, so it needs to be bold. I preferred the flavor of Braswell’s Original BBQ Sauce, a Georgia sauce I bought at Central Market that has a nice balance of sweet and acidic flavors and uses both ketchup and mustard with plenty of onions too. I also had great luck with K-Mama spicy Korean barbecue sauce, which uses gochujang (fermented red chile paste) as the base instead of ketchup.
To brown the meat you could use the grill, but I wanted a recipe that could be done completely indoors. I found the broiler in my oven to be the best tool. I love the ease of a Searzall, and it’s fun to pull a trigger to make fire, but it takes a long time to brown both sides of a pork steak with one. A cast iron skillet doesn’t work because the bone in the pork steak makes it impossible to get all the meat’s surface in contact with the hot skillet. About five minutes under the broiler on each side without sauce and another five minutes with sauce worked well. That adds twenty minutes to the cook, so with the hour of resting, you want to have the sous vide process complete about ninety minutes before you want to eat.
Sous Vide Pork Steak
Equipment
- 1 sous vide bag or sealable plastic bag
- 1 sous vide wand
Ingredients
- 1 pork steak (or as many as your sous vide container can fit), preferably cut about 1½ inch to 2 inches thick
- kosher salt
- barbecue sauce of your choice
Directions
- Set the sous vide temperature to 149 degrees Fahrenheit.
- Season the pork steak(s) liberally with salt. Use 1.5 percent of the weight of the meat to determine your salt amount if unsure, so 16 ounces of meat would require ¼ ounce (or 7 grams) of salt. Brush a thin coat of barbecue sauce onto the meat, and place it in a sous vide bag. I use a vacuum sealer, but this method with a plastic bag and a sink full of water works too. Submerge the sealed bag of meat into the water and leave it alone. You will have to add more water every 6–8 hours or so to replace what’s lost through evaporation. Flip the meat around at the halfway point if it makes you feel better, but there’s no need if it’s fully submerged in the water.
- Once the meat is done, after 24 or 28 hours depending on your tenderness preference, take it out of the water and place the bag on a plate to rest the meat for an hour. Just before the hour is up, heat up the broiler and coat a baking sheet with aluminum foil. Once the meat is rested, cut the bag open and remove it. There is liquid in the bag. You can strain it and save it for bean or soup stock, or reduce it for a sauce. But a warning for the latter: the sauce will have an unpredictable amount of salt. Blot the surface of the meat dry, place it onto the foiled baking sheet, and put it under the broiler.
- Watch the pork steak(s) under the broiler. The fat will start bubbling first, then the meat. Let it get nice and brown before flipping it and repeating the same process on the other side. Once the pork has been browned, brush a solid coating of barbecue sauce on the surface of the meat. Brown it again, and repeat the brushing and browning on the other side. It’s ready to slice and serve as soon as the browning is complete. Serve it with a dish of the warmed barbecue sauce, or pour a little sauce on the serving plate and put the sliced meat on top to warm it.


