

There’s no way baker David Norman, of Austin’s Easy Tiger Bake Shop & Beer Garden, could have known how useful his book would be when he proposed it. But here we are, mid-pandemic, and all anyone wants to do is bake bread. Just look at the popularity of the bakery’s sourdough starter kits, which continue to sell out at its drive-through location at the Linc, in the city’s Highland area. While Easy Tiger’s two other locations are closed, this site is also selling bread and Texas-grown flour from Barton Springs Mill, and donating fresh bread to food banks.
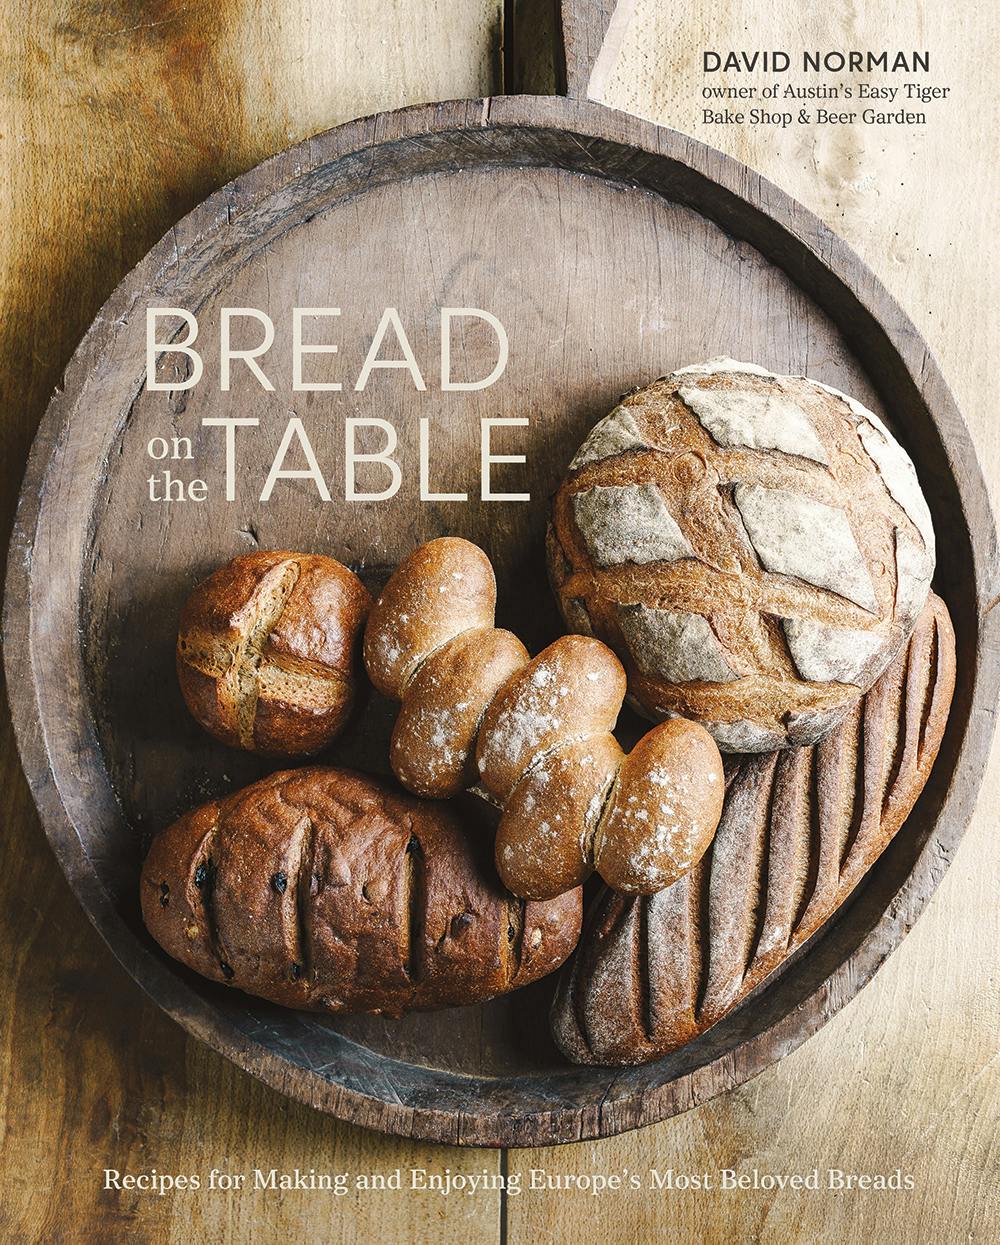
Norman’s book Bread on the Table: Recipes for Making and Enjoying Europe’s Most Beloved Breads, which came out in October, is teaching would-be home bakers just how the current James Beard Award semifinalist for Outstanding Baker does what he does. And I mean exactly what he does. The recipes are incredibly detailed—as in, they describe the exact hand movements to make while kneading bread. While I don’t recommend this book for beginners, the attention to detail will be helpful for folks who maybe haven’t been happy with the bread they’ve made in the past. You might want to have someone read it out loud to you while work, though. The book also has super-detailed instructions on how to make and maintain several kinds of starters, in case your bread needs outweigh the amount of yeast you have in your pantry.
Bread on the Table covers several bread traditions, all with the same immaculate detail. There are chapters on French bread, Scandinavian bread (Norman studied in Copenhagen while in high school), German bread, Italian bread, and, most important for our purposes, Central Texas bread. The recipe below is his take on standard white bread, the kind that you get at a barbecue joint. The type we all can’t wait to eat again out at our favorite spots, hopefully soon (although don’t forget most joints offer takeout still). But until then, you can make it at home thanks to David Norman’s instructions, below.
In Central Texas, a barbecue plate usually comes with slices of white bread tossed on top of the meat (sometimes you have a choice of a sleeve of saltine crackers). With several young pitmasters in the Austin area taking their skill to new levels, I always want a well-crafted version of the bread to go with the extraordinary meat. This is my version of the first bread I ever made, the Basic White Bread from Beard on Bread [the classic book by James Beard]. By applying the same principles and techniques, I created what is basically an artisan white bread with outstanding flavor. Of course, in addition to being the best accompaniment to a slab of fatty brisket, this makes an excellent sandwich loaf and is also great for morning toast. —David Norman
Equipment
- 1 plastic bowl scraper
- 1 8 1⁄2-by-4 1⁄2-inch loaf pan
- 1 baking stone (optional)
- 1 metal funnel with a long, flexible nozzle
Ingredients
- 520 grams (4 cups plus 1 tablespoon) all-purpose flour
- 20 grams (1 tablespoon plus 1 teaspoon) granulated sugar
- 11 grams (2 teaspoons) salt
- 3 grams (¾ teaspoon) instant yeast
- 320 grams (1⅓ cups) water
Directions
Mixing and Kneading
- Put the flour, sugar, salt, and yeast in a large bowl and blend together with your fingers to evenly distribute. Make a well in the center of the mixture and add the water, holding back a small amount (about 15 grams or 1 tablespoon) until you see if the flour needs it all.
- Make sure you have a plastic bowl scraper at hand, then start to blend the water into the flour with your fingers. As the flour begins to absorb the water and the mixture starts to thicken, plunge both hands in and squeeze the dough between your thumbs and fingers. Work from the side of the bowl closest to you across to the other side, squeezing with both hands.
- Rotate the bowl a quarter turn and squeeze your way through the dough again. You will feel the dough starting to come together as a more cohesive mass, and the water and flour will become more fully incorporated. Use your bowl scraper from time to time to scrape the sticky dough from the sides of the bowl into the center. Keep rotating the bowl and squeezing the dough until everything is fully incorporated, 1 to 2 minutes. It will remain a shaggy and sticky mass.
- The dough should be medium-soft, having definite give but also some resistance; you should be able to feel a core when you squeeze it. Add the reserved water if the dough is not soft enough. You may even have to add additional water to get the right consistency if it still feels too stiff. It is better to have a dough that is a little wet than one that is too dry.
- Turn out the dough onto an unfloured work surface, using the bowl scraper to get it all out of the bowl and scraping as much off your hands as you can. Resist the urge to add flour to the work surface or the dough at this stage.
- Starting with the edge closest to you, grab the dough with both hands, palms down, and pull it gently toward you. Stretch it up and flip it over the top of the dough mass by 2 or 3 inches and press it into the surface.
- Grab the new edge closest to you and stretch it gently up and flip it over the top.
- Repeat this stretching and flipping of the dough four or five times, working your way to the far side of the mass. The stretches should be gentle enough not to tear the dough apart. As you continue this process, the dough will hold together better and be easier to stretch.
- Scrape up the dough with a dough scraper, rotate it a quarter turn, and repeat the stretching and flipping through the dough mass four or five times, 3 to 5 minutes. With each stretch and flip of the dough, you will feel it developing, becoming more cohesive and less sticky.
- When most of the dough holds together and pulls off the work surface as you stretch it, slide the dough scraper under it and gather it into a ball. The dough will not be fully developed yet and will still be a little sticky.
- Cup your hands around the bottom of the far side of the ball and pull it gently toward you, allowing the dough to grip the work surface, then move your hands to the left, rotating the dough counterclockwise.
- Return your hands behind the dough and pull and rotate again one or two times. This will help shape the dough into a smooth ball.
- Return the ball to the bowl with the smooth side up and let it rest for 15 minutes.
- Dust your work surface lightly with all-purpose flour and turn out the dough so that the smooth side is down. Gently press out the dough to flatten it into a round about 2 inches thick.
- Grab the edge closest to you and stretch it up and over the top of the dough, about two-thirds of the way to the opposite side, and press into the surface.
- Grab the edge opposite you and stretch and fold it toward you over the first fold, about two-thirds of the way to the closest edge, and press into the surface. Rotate the dough a quarter turn and repeat two more folds, one away from you and one toward you.
- Turn the dough over so the seam side is down. Form a ball by cupping your hands around the bottom of the far side of the dough and pulling it toward you, rotating the dough counterclockwise. Repeat one or two times to form a ball. You will notice that the dough is more developed and will stretch tighter than before. Be careful not to stretch it too tight; if the surface starts to tear, stop tightening.
- Return the ball to the bowl, smooth side up, and let rest for 15 minutes.
- Repeat this stretching and folding three more times at 15-minute intervals for a total of four folds over an hour. This will develop into a smooth, elastic dough with a good gluten network.
Fermentation
- After the final fold, return the ball to the bowl, smooth side up, cover with a tea towel or plastic wrap, and let sit in a warm, draft-free place until the dough has doubled in volume and feels airy when gently touched, about 1 hour.
- Turn out the dough onto a lightly floured work surface, smooth side down. Gently press out the dough to flatten until it’s 2 inches thick. Grabbing the edge opposite you, stretch the dough and fold it over the top, about halfway toward you. Gently press the dough down, then stretch the edge closest to you and fold it over the first fold. Press it in gently.
- Rotate the dough a quarter turn and repeat two more folds, one away from you and one toward you.
- Turn the dough over so that the seam side is down. Form into as smooth and round a ball as you can. Return the ball to the bowl with the smooth side up, cover with a tea towel, and let rest until it doubles in size again, about 1 hour.
- Repeat the fold one more time, then let rest for 30 minutes more.
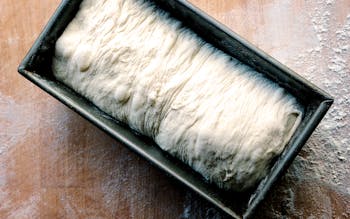
Shaping
- Spray one 8 1⁄2-by-4 1⁄2-inch loaf pan generously with baking spray.
- Dust the work surface lightly with all-purpose flour and turn out the dough so the smooth side is down.
- For this bread, you should press out the gases evenly and thoroughly to achieve a more even crumb structure, without any large holes. Press the dough out with the palms of your hands.
- Shape the loaf into a round by folding the edges into the center 3 or 4 times around the circle. Flip the dough over with your hands cupped around the dough, pulling a slight tension into the surface.
- Place the ball, seam side down, on the work surface, cover with a tea towel, and let rest for 15 to 20 minutes.
- Turn the dough over and, with the palms of your hands, press the dough out flat, pulling into a rough rectangle about 7 inches wide and 12 inches long.
- Fold the closest edge away from you about two-thirds of the way up and press into the dough.
- Fold the opposite edge over the first flap about two-thirds of the way toward you and press into the dough.
- Start again with the opposite edge and bring it over and all the way to meet the closest edge.
- With the heel of your hand, press along the edge from one side to the other to make and seal the seam.
- Roll the log shape back and forth on the work surface to make an even cylinder the length of the pan.
- Place in the pan with the seam down.
Proofing
- Preheat the oven to 475 degrees with the steaming pan in place (*see note). You do not need a baking stone.
- Cover the pan with a tea towel and let rise until the center of the loaf has crested about 1 inch above the top of the pan, about 1 hour.
Baking
- Using a funnel (**see note), steam the oven with 60 grams (¼ cup) water. Let the steam settle for 30 seconds or so.
- Open the oven and slide the pan onto the oven rack. Close the oven door.
- Using the funnel, add 117 grams (½ cup) more water to the steaming pan. Close the oven door tightly as soon as the water hits the pan.
- After 5 minutes, lower the oven to 425 degrees.
- After about 30 minutes, check your loaf. The top should be golden brown while the sides just above the rim of the pan will remain lighter. The sides should be well set and have pulled away from the pan slightly. The loaf should sound hollow when rapped on the bottom. If not, return the loaf directly to the oven rack without the pan for 5 to 10 minutes to finish baking.
- Cool the bread on a wire cooling rack until completely cool.
Notes
Reprinted with permission from Bread on the Table: Recipes for Making and Enjoying Europe’s Most Beloved Breads by David Norman, copyright © 2019. Published by Ten Speed Press, an imprint of Penguin Random House. Photography copyright: Johnny Autry © 2019


